Add, remove & assign phone numbers on demand
Manage, respond to, and share calls with your team
Send & receive any message you need to
Keep contact details in one place with a shared phonebook
For on-the-go teams to share messages, calls, and contacts
A full directory of all our included features
Creating a Facebook Page for your business
Over 140 million other businesses already have a Facebook Page, and by using Chalkboard, you can quickly get your customers to start reviewing your business and engaging with your posts. Creating a Facebook Page for your business is free.
This guide will explain exactly how you can set up your own Facebook business Page. Expect it to take around 10 minutes.
As soon as you’ve got your business Page, you can connect to Chalkboard straight away and start collecting reviews. There are links at the end of the guide to explain what things you can do to improve your Page further, but for now we’ll focus on getting a tidy and functional Facebook Page up and running.
If you don’t yet have Chalkboard, it’s also free to trial and will help you to get more local business reviews through Facebook and other sites. You can trial it for free here.
You need a personal Facebook account to create a business Page. The two will be entirely separate, so your personal Facebook posts and activity won’t be exposed on your business Page (unless you share content between them).
- If you already have a Facebook account, you’re ready to start.
- If you don’t yet use Facebook, you should sign up. It’s okay just to use Facebook for business purposes if you don’t want to use any of the main Facebook features.
When you have a Facebook account and can login and see your Facebook News Feed, you’re ready to continue.
To start creating your Page, go to facebook.com/pages/create.
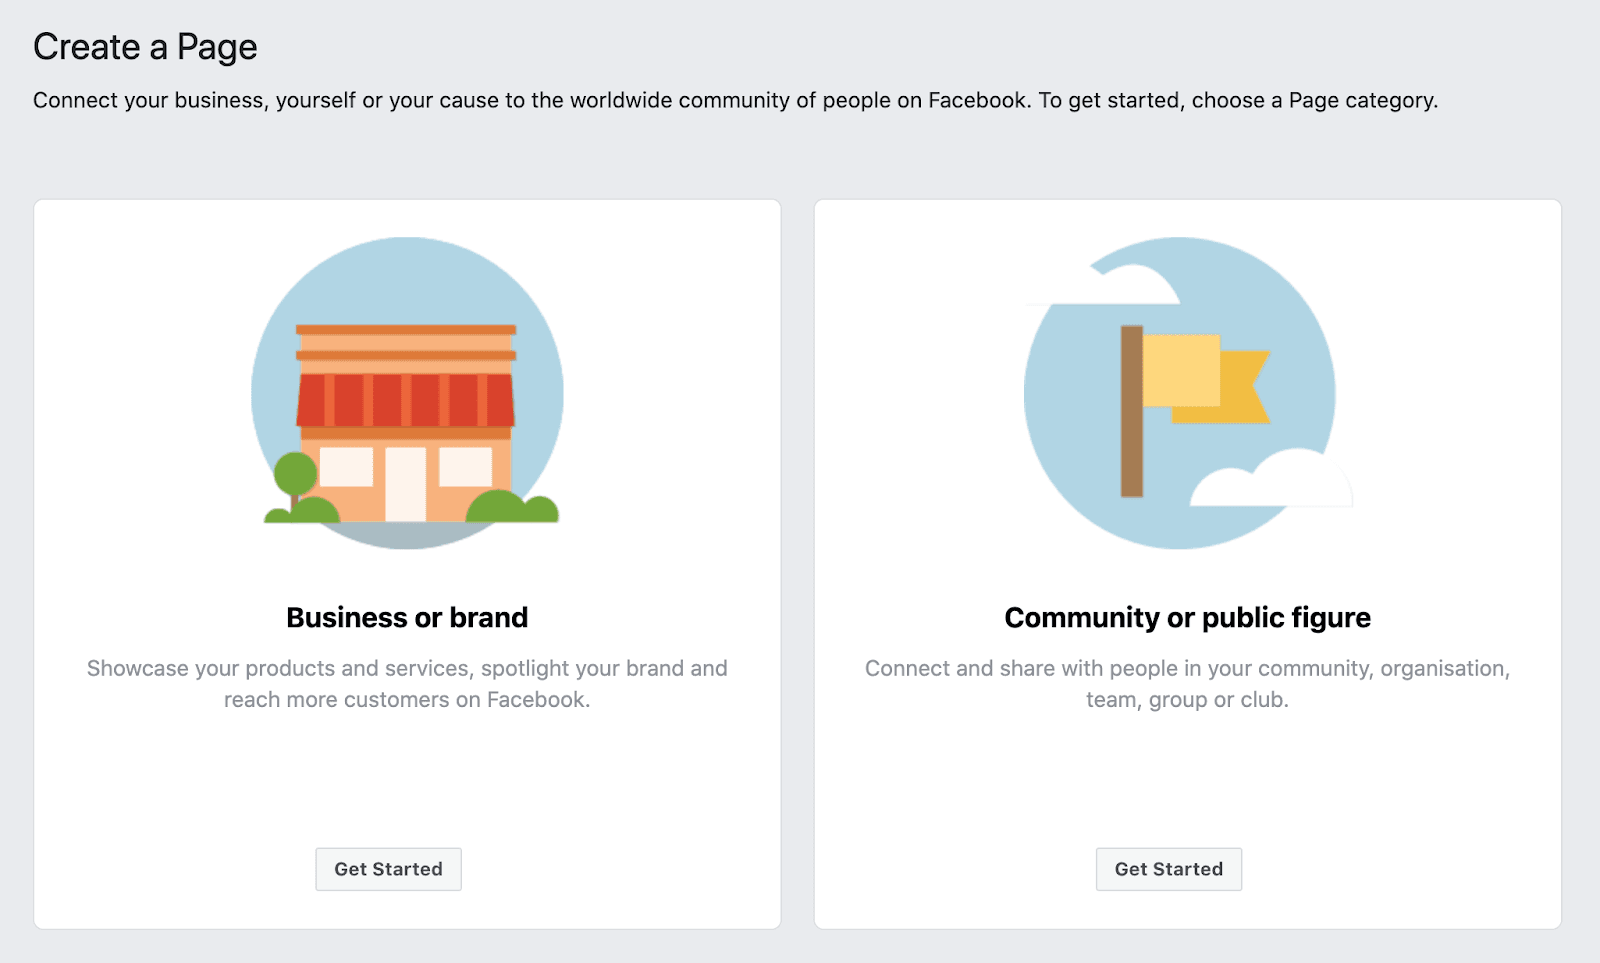
You’ll see a page like this asking if you want to create a Page for a business or brand, or for a community or public figure. We’ll assume that as you’re a Chalkboard user, you’re a local business, and should choose the first option (Business or brand). Click Get Started.
The next step is to provide a name and a category for your Page. For the name, think about what customers are most likely to know you as, or what they are likely to search under to find you on Facebook.
Good examples are “Jack’s Bakery“ or “Clean & Green Dry Cleaning”.
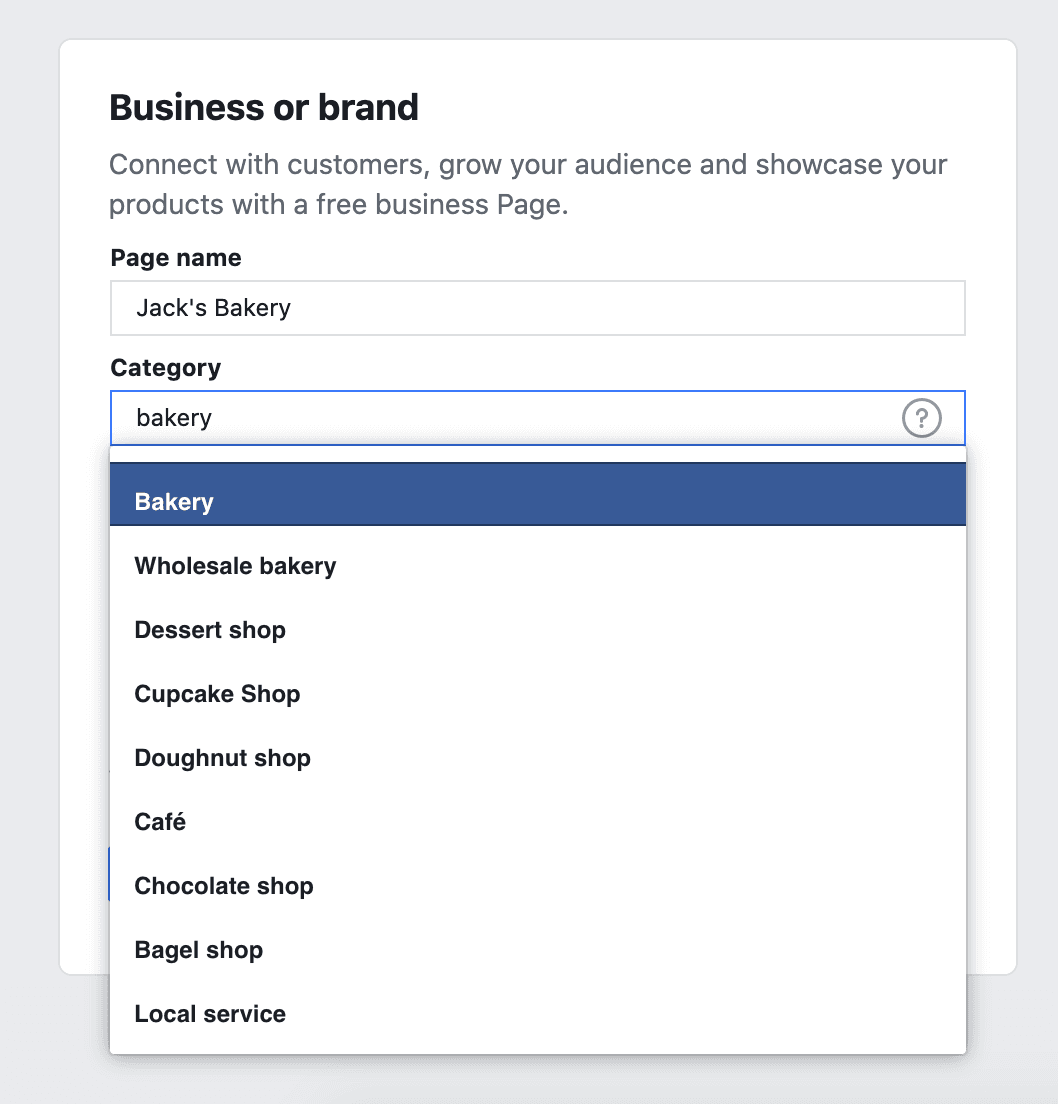
For the category, start typing a few letters and a list of suggestions will appear. Choose a main category. You will be able to add more later, but think of the main category that the majority of your customers would think you fit into.
Once you’ve selected a category, a few extra fields will appear for your address and contact details.
You can choose to show your full address, or just the city and state you’re in. As a local business that wants to encourage face to face business, it’s usually best to leave the box unticked, which shows your address to visitors of your Page.
When you’re happy, click Continue.
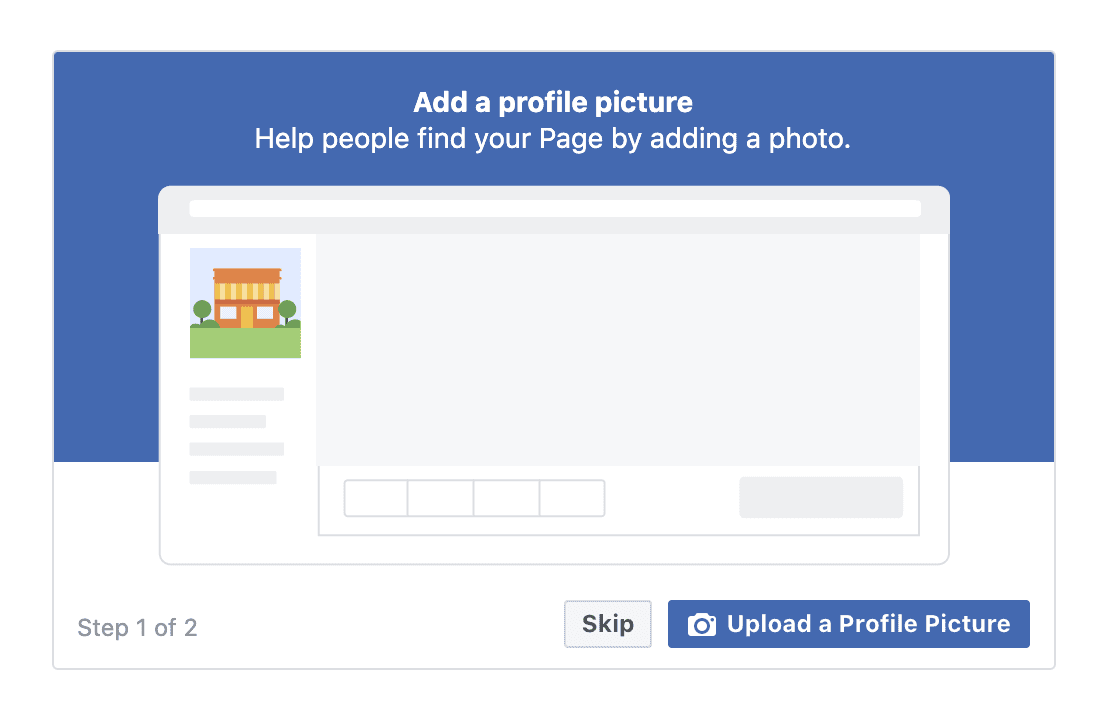
The first thing you need to do in order to make your Page your own, is to add some photos. The minimum you should add is a ‘profile picture’, and a ‘cover photo’.
A profile picture is the business equivalent of the photo you would usually have on your personal Facebook account. It’s the first thing other users see when they search for your Page.
For a local business, a safe choice is usually your logo. You could also think about using an image of your main product if you think that is more recognisable. Remember, the aim is to make your Page recognisable when Facebook users search for you.
It’s also worth noting, when you request reviews through Chalkboard, we guide your customer straight to your Page. So you don’t need to worry about getting found by customers who want to leave you a review.
Some tips on choosing a profile picture:
- The profile picture should be square(ish) in proportions.
- It will be displayed within a circular frame, so don’t put anything important in the corners, and allow enough space at the edges.
- The image will be resized to 170 pixels square on desktop computers or laptops, and 128 pixels on phones. If you’re not familiar with image sizes, pixels, etc. don’t worry, Facebook will attempt to resize your image and show it in the best possible way.
When you’ve found a suitable profile picture, click Upload a Profile Picture and select the image.
Cover photos are the large backdrops you see at the top of the Page. Use it to reinforce what your business is all about. A great choice is usually people in places.
Think about using a photo of you and your team within your business, surrounded by your products. Try and capture what your business is really all about.
The dimensions are much more flexible than for a profile picture, but here are the details if you’re interested:
- It will display at 820 x 312 pixels on a computer or laptop, or 640 x 360 pixels on a phone.
- The image must be at least 400 pixels wide and 150 pixels tall, but the recommended size to upload is 720 x 315 pixels.
If you don’t have the time to customise an image to fit these sizes, or don’t know enough about image editing to do this, don’t worry. Facebook will take any image that is large enough and try and process it so it fits well.
When you have a cover photo ready to go, click Upload a Cover Photo and select your image.
Once that’s done, you’ll land on your new business Page and should see something that looks like this:
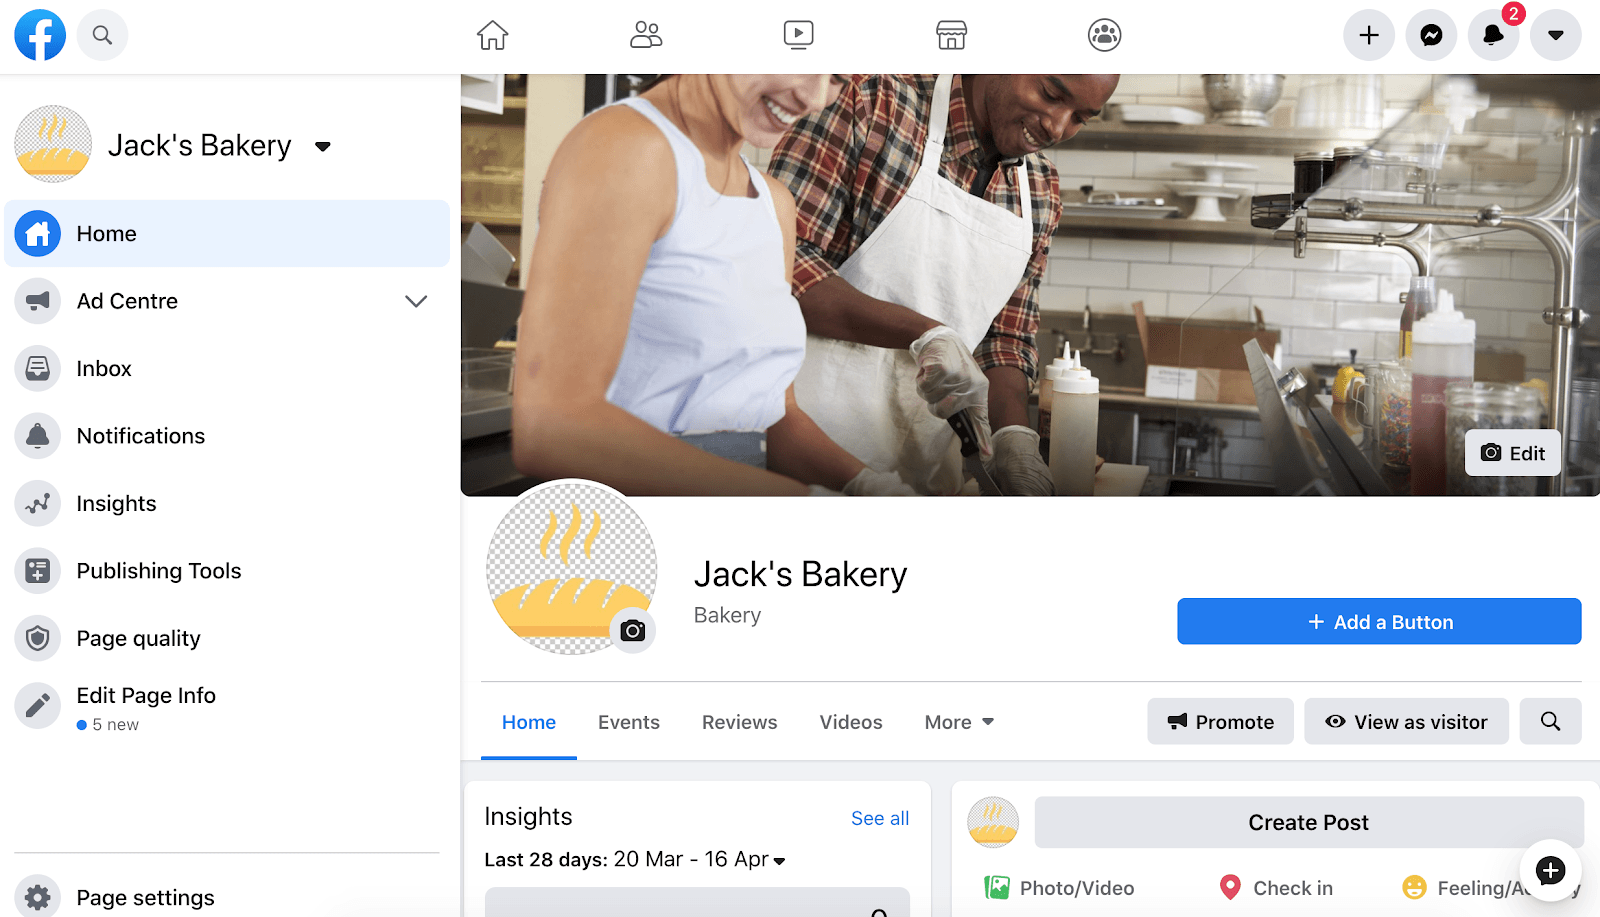
Note that Facebook are testing a new look, and the image above shows how a Page looks in the ‘new Facebook’. You may see a slightly different view if you’re using the ‘classic Facebook’.
You’ve covered the basics, but your Page may not yet be visible to the public.
To double check that your Page is published, follow Facebook’s guide to publishing your Page and make sure your Page shows as Page published.
Your business now has a complete Facebook Page. There are a few other quick things we’d recommend doing (please read on if you have time), but you’re now ready to connect Chalkboard.
If you don’t yet have Chalkboard, you can get it for free here.
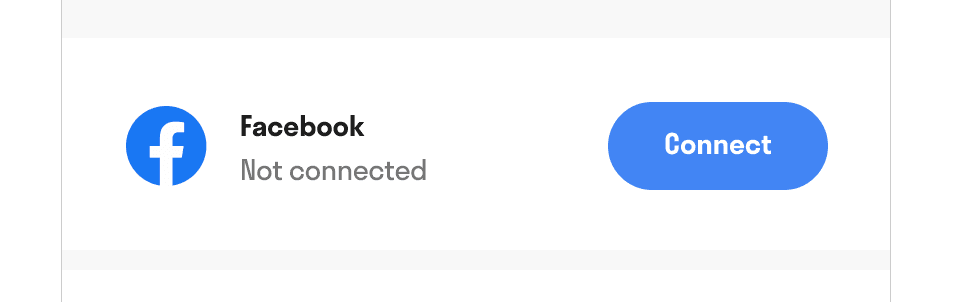
Please open the Chalkboard app, and on the dashboard you’ll see a Facebook panel. Click Connect and follow the steps to link your new Facebook Page up to Chalkboard. If you can’t find a way to connect on the dashboard, click Settings on the menu, then click Connected Accounts.
Creating a Facebook username is always a good idea because it prevents anyone else from taking your name, and also makes your Page URL nicer to read (it will show your Page username rather than an ID).
Keep in mind that new Pages may not immediately be able to create a username. If so, you may need to wait some time (maybe a few weeks), or wait until you have some activity on your Page. Using Chalkboard is a good way to generate activity.
Choose a username that is as close to your business name as you can. Our example Page name is Jack’s Bakery, and so a perfect username would be ‘jacksbakery’. Make sure the username you're trying to create follows Facebook’s guidelines for custom usernames.
To get your business a username:
- If you’re using classic Facebook: Click on Create Page @username below your Page name on the left. Type a username, and then click Create Username when you’re ready.
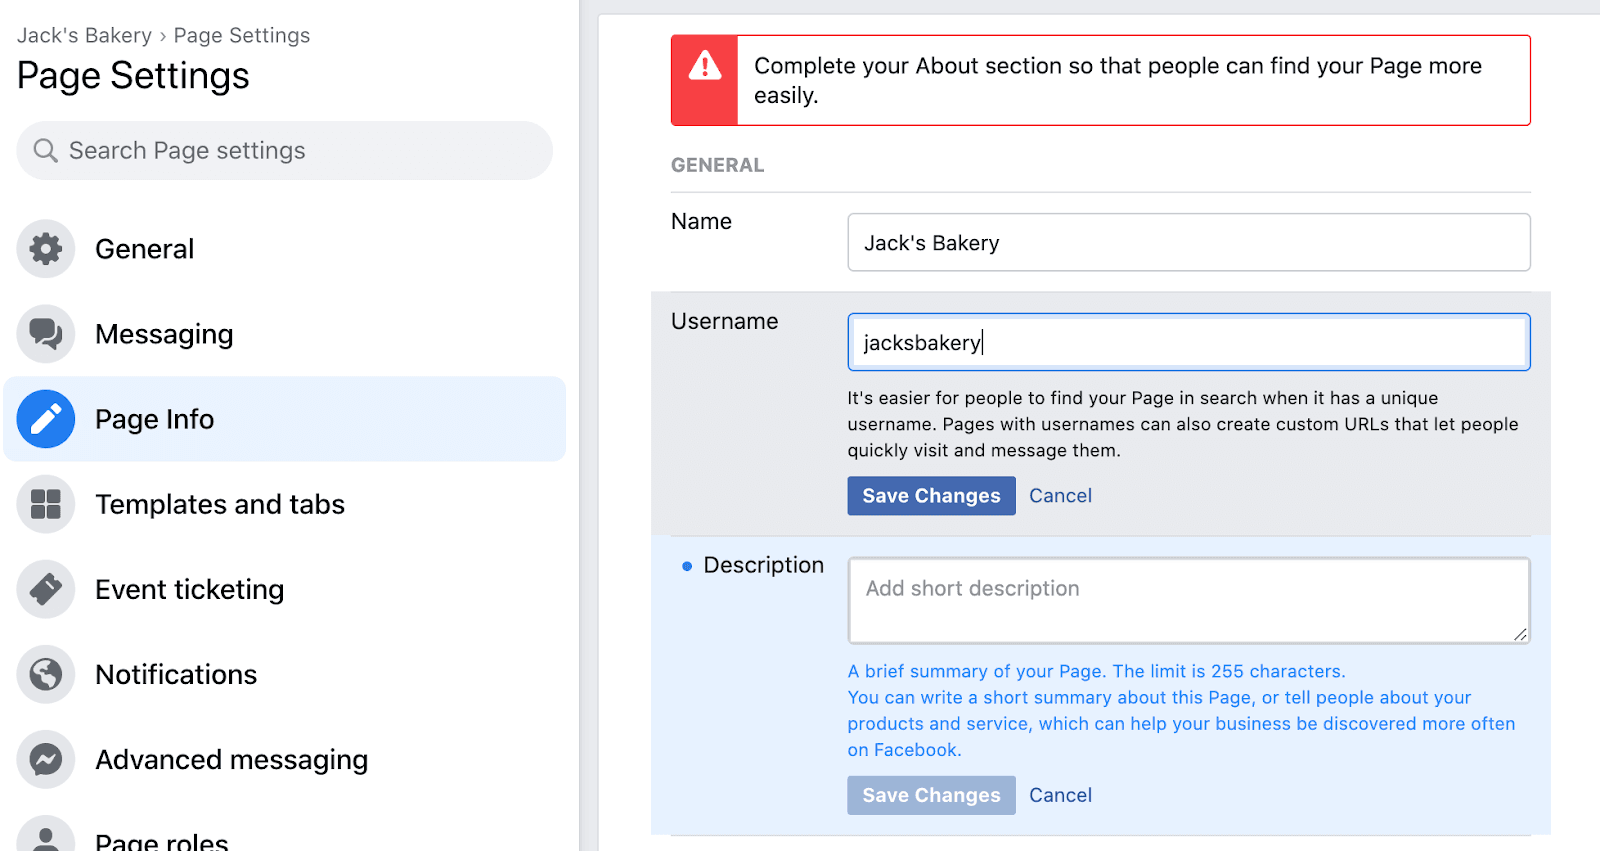
- If you’re using the new Facebook: Click on Edit Page Info on the left hand side, and you’ll see Username in the list of fields. Type your preferred username and click Save Changes.
So far, you’ve only added your business name, address, and a couple of photos to your Page. To make it really useful, you should fill out a lot more information.
To get to the right place to do this, follow the steps depending on the version of Facebook you’re using:
- If you’re using classic Facebook: Click on the About option on the left hand menu (under your business name and profile picture). You may need to click See more to reveal this. You’ll find yourself on a page where you can edit all the info about your business.
- If you’re using the new Facebook: Click on Edit Page Info on the left hand side. You can edit all the info about your business on this page.
Here’s a quick summary of all the information you should provide.
Description
Provide a short description (a couple of sentences), which will show up in search results to describe your business. You can add a more detailed description in another section later.
Categories
You’ll see the single category you selected when you started creating your Page earlier. Now you can add other relevant categories, if there are any.
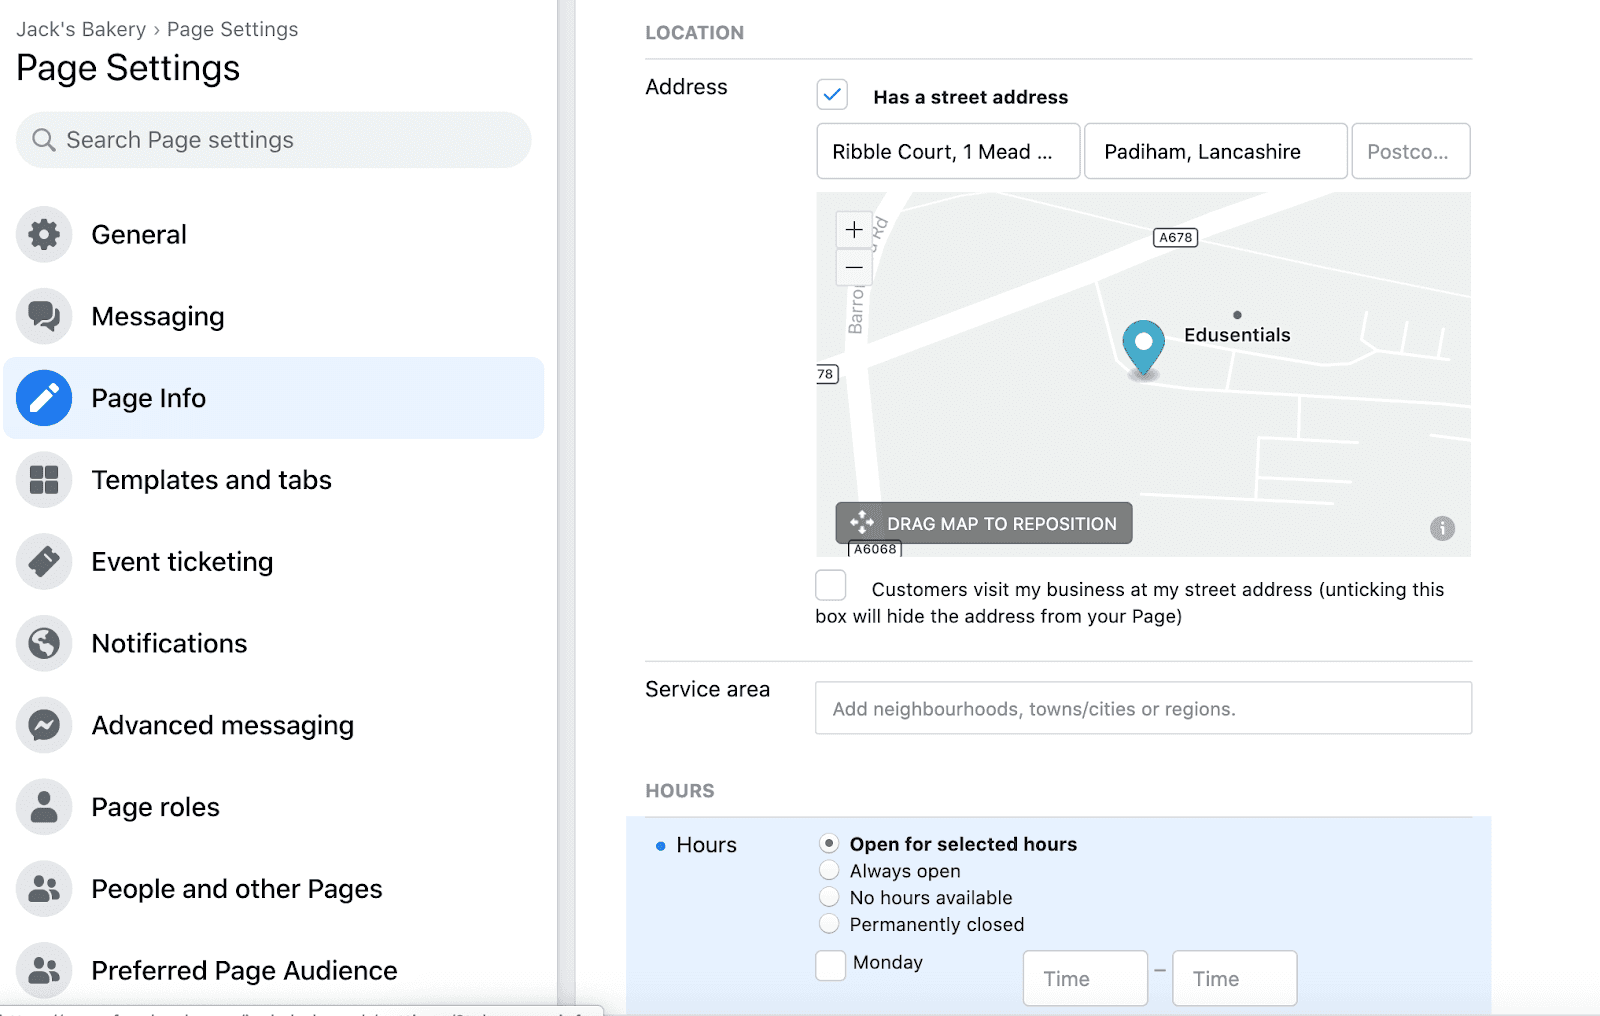
Location
If you have customers visiting you, it’s really important to make sure the map shows the exact location of your business. Drag the marker so it shows your exact address.
You can also add details of your service area to show where you deliver to, etc.
Hours
Tell your Page visitors what hours you’re open. Keep this updated often so customers don’t have a wasted visit.
You’ve now got all the basics covered, as you have a published Facebook Page, with a profile picture and cover photo, with a username and all of your basic business information.
So you’re definitely ready to start using Chalkboard to help your customers review you. Just by generating reviews, you’ll be strengthening your Facebook Page and promoting your business to friends of customers.
There’s still other things you can do to improve your Facebook presence further. We’ve linked to other useful content to help you to do this.
- Don’t forget: Link up Chalkboard and start requesting reviews!
- Add a Facebook Story.
- Invite your Facebook friends to like your Page.
- Write your first post.
- Add more photos.
- Create a call to action button.
- Pin important posts to the top of your Page.
- Use Facebook Ads to promote your Page to new customers.
- Customise the layout of your Page.
- Link to your Facebook Page from other sites (including your own website).
Updated 1456 days ago.
If you can’t find an answer here, you can always contact our friendly team through the Chalkboard app. Click Settings, then Contact us.
Alternatively, you can email us on [email protected]